Although there is a great deal of current debate about Building Regulations not changing fast enough to keep up with modern efficiency demands, the rules regarding external wall insulation are an exception.
Gone are the days of simply picking an outer brick and an inner block and adding in some arbitrary cavity insulation; today, the process is a fine (and very calculated) art.
Cavity wall principles
Having two layers of brickwork with a space between them is known as cavity wall construction. This method was first introduced in the early 20th century as a way to provide better protection against penetrative damp and to help keep the inside of walls dry.
Dense concrete blocks started to be used for inner cavity layers after the Second World War, with lighter weight blocks (with air insulation) introduced in the 1960s and 1970s. A decade later and insulation started to be introduced into the cavities.
The significance of airtightnessExternal walls make an important contribution to airtightness, which is key to overall energy performance. It’s all very well spending time and effort selecting products, but if the interface and detailing is poor then the house could suffer from heat escaping. The Building Regs set an air leakage limit of 10m3/hm2 at a regulated pressure of 50 Pascals – but in practice you’ll probably need to achieve at least 5.0m3/hm2, which is effectively five air changes per hour under testing. By comparison, a property meeting Passivhaus standard would have to achieve 0.6m3/hm2. |
Today, thermal (air-concrete) blocks are made from pulverised fuel ash (PFA) and sand, plus a cementitious binder (lime/cement) and raising agent, which allows the mix to rise in its mould.
They are lightweight and easy-to-handle, plus there’s minimal conductivity (which makes them relatively good insulators). Different thicknesses and strengths can be produced.
Increasing strength usually also ups the density, which reduces conductivity (so it’s less insulating, but offers better thermal mass). Good performance can be achieved with
all these blocks; it’s about choosing the right overall wall makeup.
Achieving the threshold U-value of 0.30 W/m2K is straightforward. Most big developers would do this with 300mm-thick walls, consisting of a 100mm external facing brick, a 100mm internal thermal block and a choice of insulations in the cavity gap.
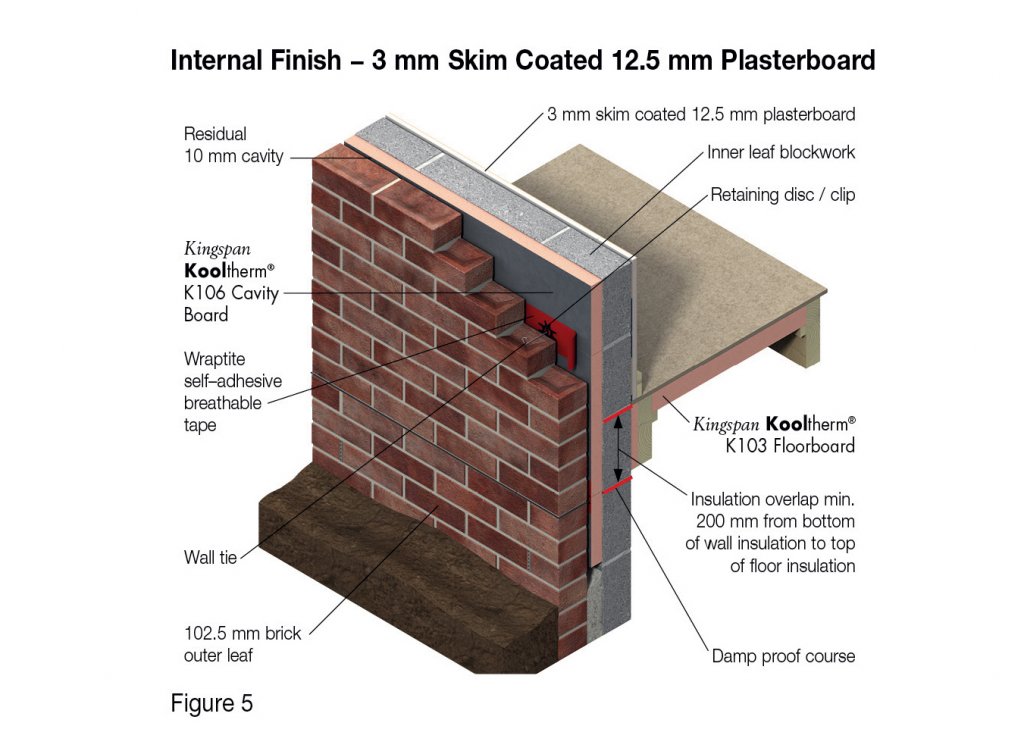
This diagram by Kingspan shows how the Kooltherm K108 Cavity Board fits into the external wall system, needing only a 10mm gap
Source it: Find Kingspan Insulation products in the Build It Directory
This sits comfortably on a 600mm foundation (with 150mm safety margin on either side). In practice, you’ll want better U-values, which means you’ll need to increase the insulation thickness and/or opt for a more substantial internal block skin. Alternatively, using a specialist insulation known as Cavity Therm will allow you to keep a 300mm wall thickness.
Blocks are bought from builder’s merchants and each retailer generally has their own favourite supplier. Shop around until you get the product you want from the trader that has the best supply arrangements – 100mm-thick lightweight blocks bought in a bulk order are likely to cost in the region of £15-£20 per m2.
Thin-joint systems
A neat way to improve performance is to go for thin-joint. The blocks used are basically the same (albeit larger).
The main difference is that a thin layer of adhesive grout is used to bond the units together instead of the standard 10mm mortar bed. Normally, the sand and cement mortar paste makes up roughly 7.5% of the wall; and as it’s a highly conductive material, it reduces thermal efficiency.
The post How to Insulate a New Masonry Home appeared first on Build It.
Article reference How to Insulate a New Masonry Home
No comments:
Post a Comment